How a multi-lane range works
- Every target has its own target hub, and every hub has a target number (1 to 10). Each number is used once on the range.
- One relay at the firing line hears every hub by radio and runs the app on its WiFi. One relay handles up to 10 targets and 12 phones.
- Each target's settings (distance, board size, target design, sensor spacing, calibration, bulls) are kept on the relay. Set a target once and every phone that opens it gets the same settings.
- Shooters join the WiFi, take their target (or their bulls on a shared board), and their name shows on it for everyone. While a target is taken, only that shooter's phone can change its settings or clear its shots.
- Your range officer tools are in the app at Settings › This relay (range officer). Changing them needs the range officer PIN, printed on the card in your system's box. Keep the card with the relay.
1. Plan the lanes
Fill this in before range day; it becomes your naming and numbering plan.
| Lane | Target number | Name shooters see | Distance | Board · target | Shooters |
|---|---|---|---|---|---|
| 1 | 1 | Lane 1 · 100 yd | 100 yd | 24 in · NRA | 1 |
| 2 | 2 | Lane 2 · 4 bulls | 100 yd | 24 in · 2×2 grid | 4 (bulls 1–4) |
| 3 | 3 | Lane 3 · 300 yd | 300 yd | 24 in · NRA | 1 |
| 4 | 4 | Lane 4 · 600 yd | 600 yd | 36 in · NRA | 1 |
- Give lanes left to right the numbers 1, 2, 3… so the target number matches the lane. It makes everything easier to call on the line.
- More than 10 targets, or more than 12 phones: ask us about the Range in a Box, info@oversighttargets.com.
2. Before range day
- Charge every hub and the relay overnight.
- Update every box to the same firmware build (Firmware updates): do it at home, not on the line.
- Pack a label or paint pen for the hub numbers, spare pods and cables, and the range officer card with the PIN.
- Put the backers, bases and targets up as in the Quick start, one per lane.
3. Add the hubs
A new hub has no target number yet. For the first 10 minutes after the relay is switched on, the relay gives every new hub it hears the next free number (1, 2, 3…) and adds it to its own targets. Each hub keeps its number from then on, so on every later range day all the targets just come back.
- Switch on the relay, then switch on the hubs, ideally in lane order (lane 1's hub first): each gets the next number. A new hub's first battery light pulses blue until it has a number.
- Join the relay's WiFi and open Settings › This relay (range officer). Under Hubs every hub is listed by its serial with its number, battery and signal. Enter the PIN.
- Tap Identify on a hub: that box's battery lights flash blue. Label the box with its number.
- To give a hub a different number, type it and tap Set: the hub restarts as that number in a few seconds.
- Missed the 10 minutes? Tap Find new hubs (10 min). Stop adding closes it early. Untick Add new hubs for 10 minutes every time this relay starts once your range is set up, if you'd rather nothing is added by itself.
If two hubs ever answer on the same number, the app shows Two hubs on one number · fix at the top: tap it, then give one of them a free number. With two relays at one range, switch on only one of them while adding hubs.
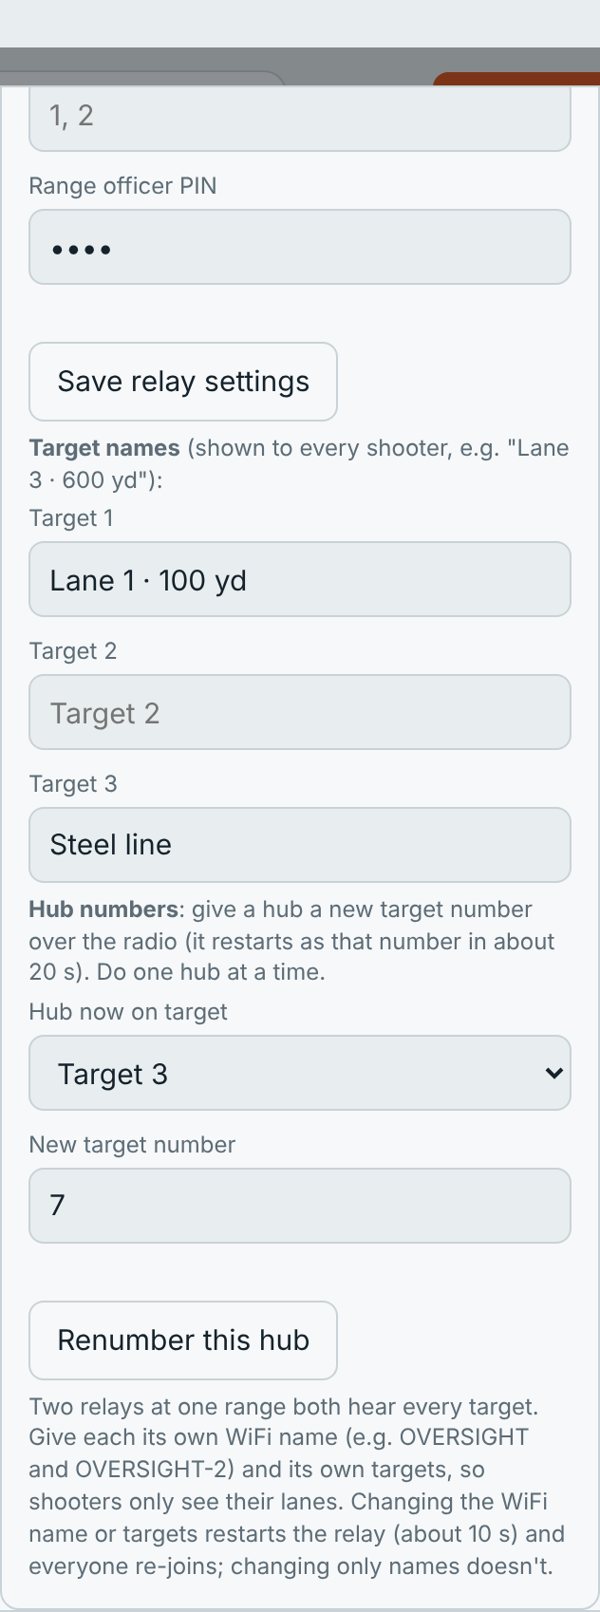
Hubs on older firmware don't show in the list; they keep working. Number them under Hub numbers (older hubs): only that hub switched on, pick it, type the new number, Renumber this hub.
4. Name the lanes
- In This relay › Target names, give each target the name from your plan, for example Lane 2 · 4 bulls.
- Tap Save relay settings. Names show in every shooter's target list straight away; saving names doesn't restart the relay.
5. Set up each target
Do this for each lane before shooters take them (a taken target can only be changed by its shooter):
- Pick the target in the list at the top and choose Just watch.
- In Settings › Shooting: distance, board size and target design.
- In Frame and sensors: enter the target size and tap Fill for Lite mounts.
- Tap Save settings. Every phone that opens this target now gets these settings.
- Fire a 3-shot check at the centre of each lane, and calibrate if the group sits off (Calibrating the centre).
7. Bench cards and setup links
A card at each bench saves every shooter the setup. Each card has two QR codes: the relay's WiFi, and a link to that bench's lane.
| Bench | Link in the second QR code |
|---|---|
| Bench 1 (whole target) | http://192.168.4.1/#1?lane=1 |
| Bench 2-1 (bull 1 of target 2) | http://192.168.4.1/#2?bulls=1 |
| Bench 2-2 (bulls 2 and 3) | http://192.168.4.1/#2?bulls=2,3 |
- For the WiFi QR code, most phones' WiFi settings have a Share button that shows one; or use any WiFi QR maker with the network name and password.
- A setup link can also set the target for you:
http://192.168.4.1/#2?setup=1&board=24&face=grid-2x2-5.0&dist=100&lite=1sets target 2 to a 24 in board, the 2×2 grid, 100 yd, Lite spacing. - We print laminated bench cards for your layout: send us your lane plan, info@oversighttargets.com.
8. Two relays (two bays or groups)
Split a range into two groups, each with its own relay and WiFi. Both relays hear every target, so give each its own WiFi name and its own targets:
| Relay | WiFi name | Targets on this relay |
|---|---|---|
| Bay 1 | OVERSIGHT | 1, 2 |
| Bay 2 | OVERSIGHT-2 | 3, 4 |
- Join the second relay's WiFi (at first it is also called
OVERSIGHT: switch the first relay off while you do this). - In This relay, set its WiFi name and Targets on this relay, enter the PIN and tap Save relay settings. It restarts with the new name in about 10 seconds.
- Switch the first relay back on and set its targets the same way. Shooters then only see their own bay's lanes. Both relays together still share the same 10 target numbers.
9. Running the line
- Shooters arrive: join the WiFi (bench card or
OVERSIGHT/shoot1000), take their lane, type their name. Everyone else can only watch a taken lane. - Watching: pick any lane and choose Just watch to follow it from your phone or a tablet at the line.
- Changing over: the shooter taps Leave. A phone that walks away without leaving frees the lane after about 3 minutes.
- Busy line: if muzzle blasts show up as shots, set Settings › Trigger to Busy range (then Ignore muzzle blasts) on the affected lanes and tap Send to the target hub. Step back one level if real shots go missing.
- Cease fire: nothing in OVERSIGHT needs touching downrange during a cease fire. To change targets, slide the two top pod plates off, swap the target, slide them back.
- A pod is hit: the target keeps working on four pods; clip on the spare at the next cease fire.
Never let anyone go downrange to the hubs or targets except during a cease fire, and never shoot at the pods, bases, hubs or stakes.
10. End of the day
- Ask shooters to export anything they want to keep (Stats › Export CSV) before they leave the WiFi.
- Switch off the hubs, then the relay. Settings, names and hub numbers are kept.
- Pack each hub with its lane's pods and cables; charge everything before next time.
Range officer quick reference
| RO settings | Settings › This relay (range officer) · PIN on the card in the box |
|---|---|
| Add hubs | Relay on, then the hubs: numbered automatically for 10 min · Find new hubs reopens it · Identify flashes a box |
| Change a number | Hubs › type the number › Set |
| Name lanes | Target names › Save relay settings (no restart) |
| Set a lane up | Pick it › Just watch › Settings: Shooting + Fill for Lite mounts › Save |
| Second relay | WiFi name + Targets on this relay › Save (restarts ~10 s) |
| Free a lane | Shooter taps Leave, or ~3 min after their phone leaves the WiFi |
| Limits | 10 targets per range (numbers 1–10), 12 phones per relay |
| Help | info@oversighttargets.com |
Still stuck?
Email info@oversighttargets.com with what you see and, if you can, a photo of your setup or the app's debug export (see Sending us data). We reply within one business day.